
Are you someone who is experiencing issues while trying to host your website on Google Cloud Platform? Then here are some expert tips to help you with getting your website hosted perfectly.
There are two means to manage the files in your web server- through FTP clients like FileZilla and through cPanel.
Out of the two, FileZilla is an open source software and suits you if you’re low on budget. But it has some downsides too – It can handle only FTP, you can’t make bulk edits to your files, it is time consuming, etc.
cPanel on the other hand can handle mailboxes, MySQL, Cron Jobs, etc and also has a built in FTP. It’s interface makes it very easy to manage your files. However, cPanel is costly and you’ll have to pay either a monthly or yearly charge.
Before we begin, you need to take note of some key points:
- Once you deploy WordPress on Google Cloud, you can only manage your files via FileZilla
- Instead, if you install cPanel first and then deploy WordPress on Google Cloud, then you can manage your files via cPanel or FileZilla.
Keeping this in mind, you can choose the order of the installations detailed below.
Here we are taking the example of a WordPress website. Follow similar steps for other websites as well.
If you need professional help with hosting your website on Google Cloud, feel free to contact our team of expert web developers who can assist you!
Now read on.
Deploying WordPress
1) Head on to Google Cloud Platform
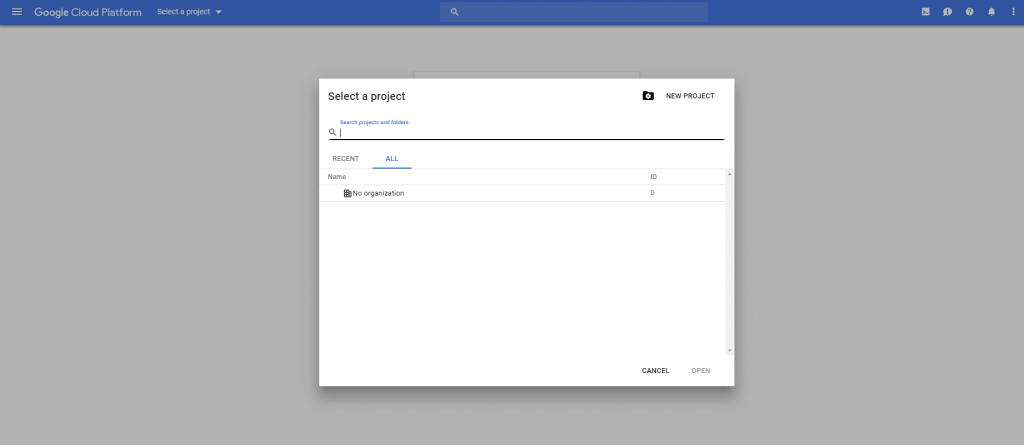
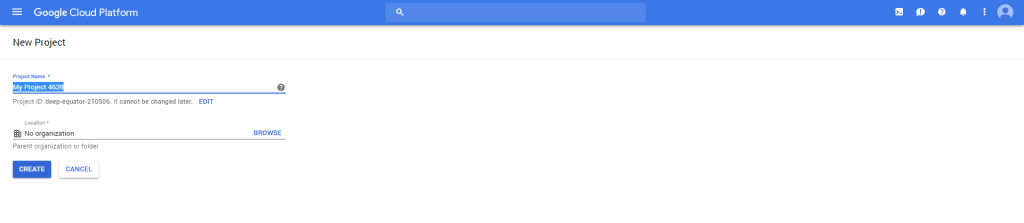
2) On the dashboard, click on ‘Select a Project’. In the resulting pop-up menu, click on ‘New Project’.
3) Assign the project name and location and click create.
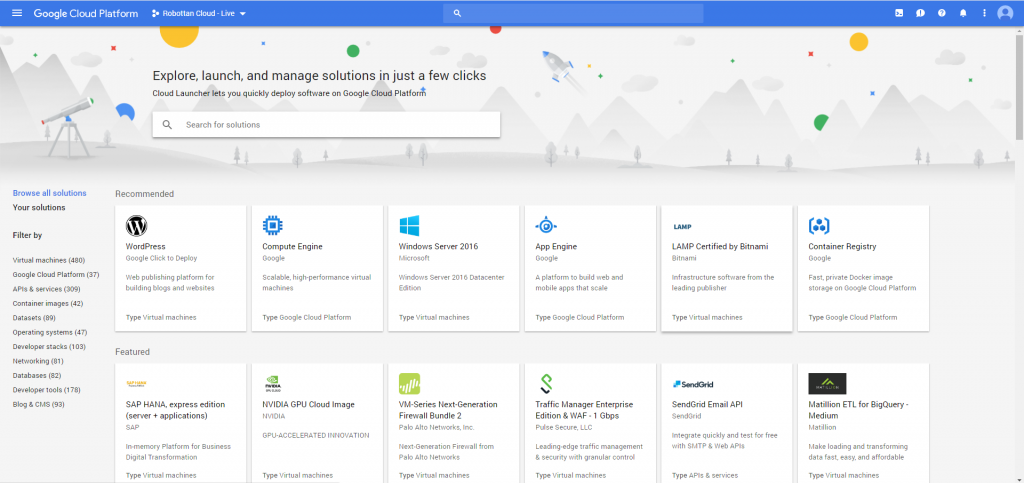
4) Navigate to ‘Marketplace’ on the left side menu of the Google Cloud Platform dashboard.
5) Now find and select ‘WordPress’ from the list.
6) Click ‘Launch on compute engine’.
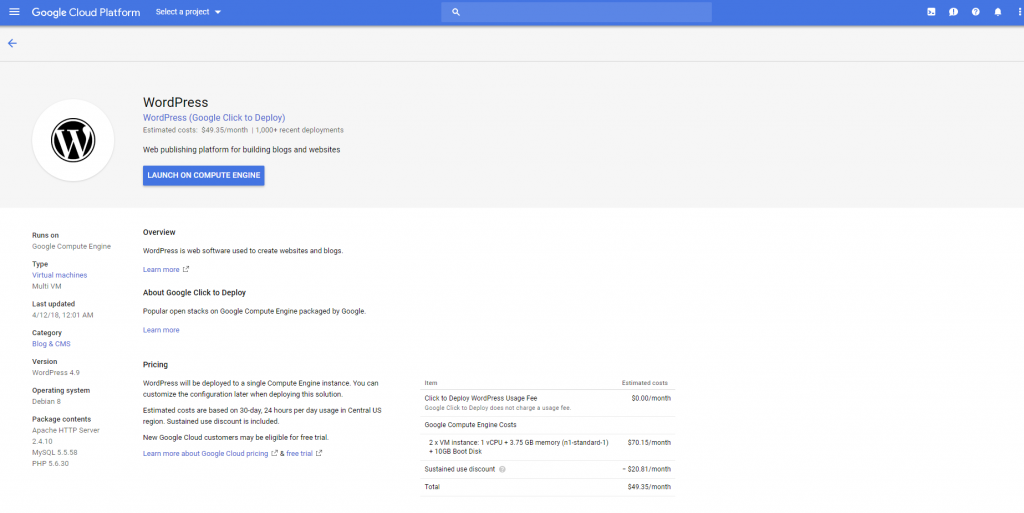
7) Then fill in the WordPress deployment form and click on ‘Deploy WordPress’.
8) Now you’ll be directed to the deployment information screen.
9) Click on the External IP address under ‘WordPress Server’ section.
10) Then tick both ‘Allow HTTP Traffic’ and ‘Allow HTTPS’ Traffic and click apply.
11) Now enter the IP Address into your browser URL and you’ll be directed to your WordPress site.
Setting up FileZilla
Note that you won’t be able to edit the files in your web server if you don’t have root access to it. Gaining root access is easy –
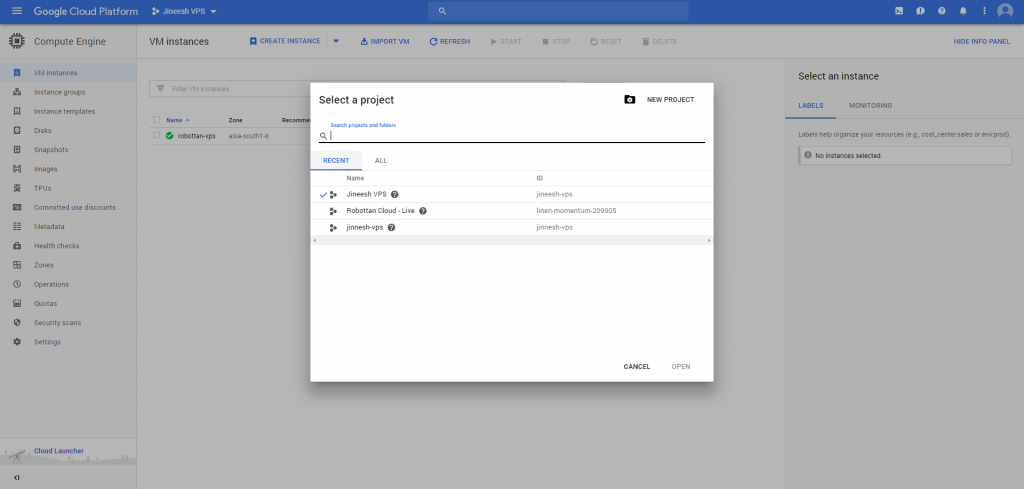
- In the Google Cloud Platform dashboard, navigate to ‘Compute Engine’ and then ‘VM instances’.
- Under the ‘Connect’ tab, click on ‘SSH’.
- Now the SSH terminal will appear.
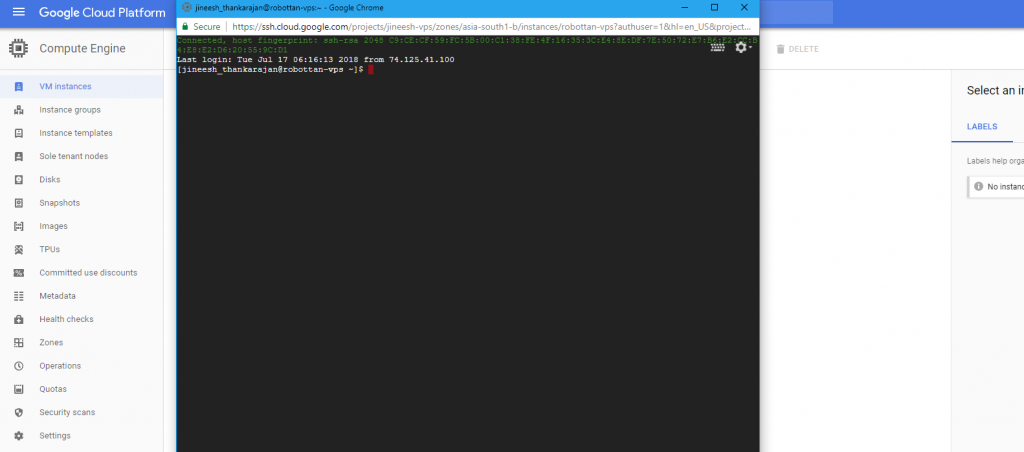
Enter the following command to the terminal :
sudo <command>
Now you will be assigned root privileges.
To give read/write permission (777 Permission) to your installation folder, enter the following command to the terminal:
sudo chown -R <username>:<username> .*
1) Specify the -C flag to add a comment with your username.
ssh-keygen -t rsa -f ~/.ssh/[KEY_FILENAME] -C [USERNAME]
where:
- [KEY_FILENAME] is the name that you want to use for your SSH key files. For example, a filename of my-ssh-key generates a private key file named my-ssh-key and a public key file named my-ssh-key.pub.
- [USERNAME] is the user for whom you will apply this SSH key.
This command generates a private SSH key file and a matching public SSH key with the following structure: ssh-rsa [KEY_VALUE] [USERNAME]
where:
- [KEY_VALUE] is the key value that you generated.
- [USERNAME] is the user that this key applies to.
2) This command restricts access to your private key so that only you can read it and nobody can write to it: chmod 400 ~/.ssh/[KEY_FILENAME]
- where [KEY_FILENAME] is the name that you used for your SSH key files.
3) Now, in FileZilla, click on “Quick connect” and select “STFP” as the protocol.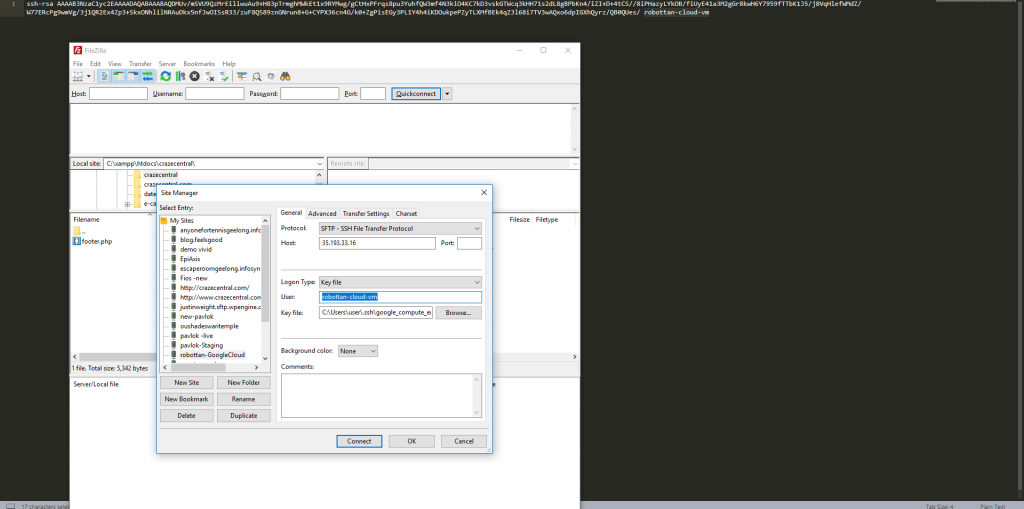
4) Set the host IP Address.
5) Select “Key file” as logon type and enter the username.
6) Now select browse to locate the key file and then select the previously generated key
7) Now click “connect”.
Installing WHM & cPanel
1) In Google Cloud Platform, create a new project with name and location
2) Navigate to the Compute Engine section and select VM instances.
3) Select the project you created.
4) Now create an instance, specifying the appropriate region and zone.
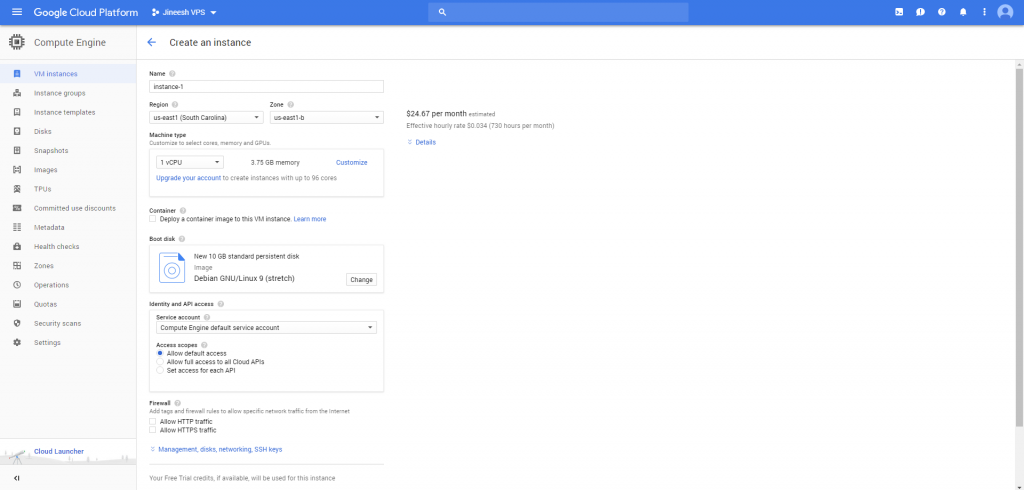
5) Select “CentOS 7” as the boot disk.
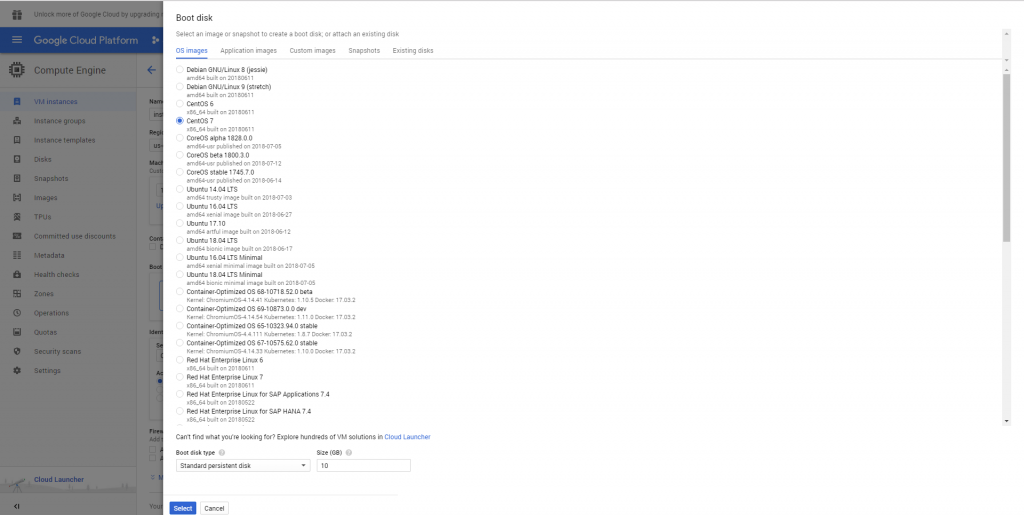
6) Specify the disk size and disk type. Then click create.
7) Navigate to ‘Network Services’ on the left side menu of the GCP dashboard. Then select ‘Cloud DNS’.
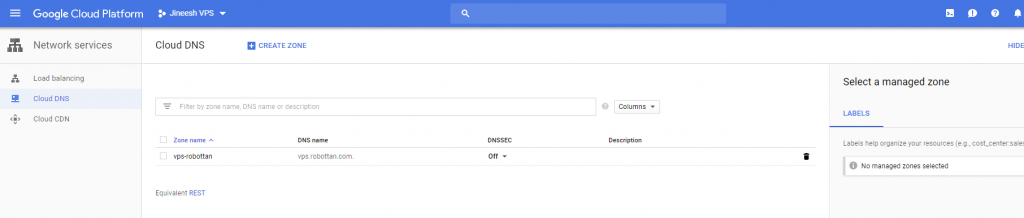
8) Now click ‘Create zone’.
9) Configure the zone name, DNS name and DNSSEC and click ‘create’.
10) In the ‘VM instances’ section under ‘Compute Engine’ on the GCP dashboard, find the instance you wish to connect to and click on ”SSH”

11) Now the SSH terminal window will appear. Run the following scripts in order :
- Yum update yum install perl
- Yum install wget
- Hostname [YOUR DOMAIN ADDRESS] // Enter the domain address you want your site to point to in place of [Your DOMAIN ADDRESS]
- systemctl stop NetworkManager.service // To stop Network Manager
- systemctl disable NetworkManager.service
- cd /home
- curl –o latest –L https://securedownloads.cpanel.net/latest
- sh latest
Now the External IP address will be displayed on the terminal
12) To set firewall rule port configuration for WHM do the following:
- Navigate to VPC network at the left side menu of GCP dashboard
- Click on ‘Firewall rules’
- Click ‘Create firewall’
- Set IP Address as ‘0.0.0.0/0’
- Assign port ‘2086’
- Click ‘create’
- Follow the above steps again and assign port ‘2087’.
13) To set firewall rule port configuration for cPanel do the following:
- Navigate to VPC network at the left side menu of GCP dashboard
- Click on ‘Firewall rules’
- Click ‘Create firewall’
- Set IP Address as ‘0.0.0.0/0’
- Assign port ‘2082’
- Click ‘create’
- Follow the above steps again and assign port ‘2083’.
14) Now you need to update the root password
- Go to the SSH terminal and run the following script
- passwd
- Enter the new password.
15) Click on the External IP Address displayed on the terminal. You will be redirected to WHM.
Then login with the username “Root” and the password you set.
Now you can proceed to configure your server.
In a nutshell
Choosing between installing cPanel or using FileZilla to manage the files in your web server comes down to your preference and budget. If you’ll have to edit the files for any reason, going for the cPanel installation before deploying WordPress would be a better idea.
Points to note:
- You need root access to manage your files via FileZilla. Without the access you will not be able to make any edits to the files. This is not needed if you’re using cPanel.
2. Always set ‘CentOS’ as the boot disk while installing cPanel.
3. While setting up a VM instance on Google Cloud Platform, you are required to specify a region( a geographical location where you can run your resources) and a zone (an isolated location within the region). Once you specify these and create an instance, you will NOT be able to make edits to these later on.
Follow the aforementioned guidelines for an error-free website hosting!
In case all of this seems confusing to you, fret not, our team of skilled website developers can help you out! Connect with us to learn more.
Facebook Comments